Main Settings
Diffuse Tex
This will be your main texture for the shader, anything that is put in this slot will have the full effects list applied to it. This texture is separate from the Overlay settings.
Tint Color
This will allow you to tint the texture and set the overall intensity, useful for adding glow. Make sure you have the post processing set up in your unity scene or no glow will be visible.
Quickstart Guide for Unity Lighting and Post Processing
Click the image below for the youtube video or the link here: https://www.youtube.com/watch?v=NOv31HSqs6U
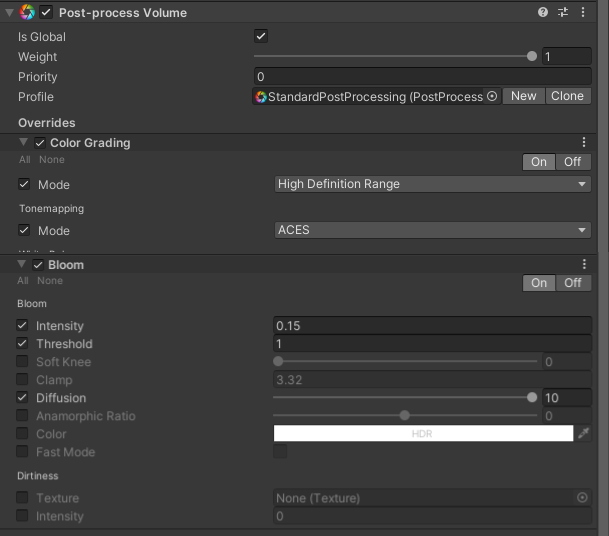
My Personal Settings:
Scanlines
This is the main controller for the scanlines effect, more details can be found in Scanline Settings.
VHS
This is the main controller for the VHS effect, more details can be found in VHS Settings. (Effect will be subtle in the gif preview below)
Chromatic Aberration
This is the main controller for Chromatic Aberration effect, more details can be found in Chromatic Aberration Settings.
Edge Falloff
Toggling this will make all effects and textures fade out near the edges.
Use Mask For Falloff
Toggling this will use a provided image as the mask for the falloff instead of the edges.
Mesh Displacement
Toggling this will displace the mesh along the normal direction of the mesh the material is applied to.
Cull Mode
Setting the cull mode determines what side of the mesh the texture will render on. The options are:
- Off (Both sides)
- Front (Render/shown on back)
- Back (Render/shown on front)
Think of it like Cull = Hidden
ZWrite
Z Write controls how the pixels for the shader are rendered. More of an advanced setting to get around issues with multiple transparent objects overlapping. More info can be found in the unity docs: https://docs.unity3d.com/Manual/SL-ZWrite.html